
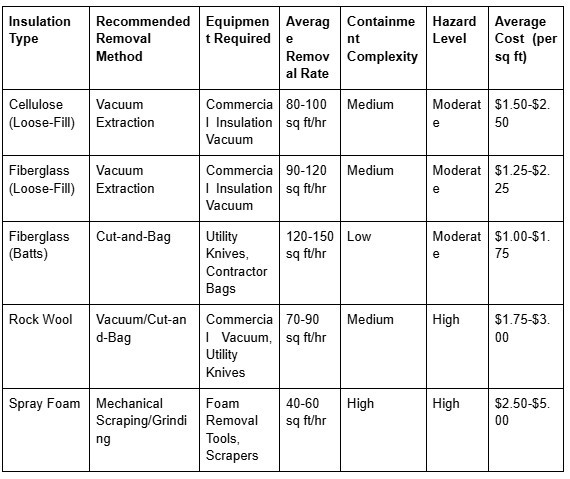
Insulation removal becomes straightforward when using the appropriate technique for each material type: vacuum extraction for loose-fill materials (achieving 95-98% removal rates), cut-and-bag methods for batts and blankets, and specialized scraping/grinding for spray foam insulation. Professional equipment dramatically improves efficiency and safety, with high-powered vacuum systems processing up to 80-100 square feet per hour while containing harmful particles and high-amperage foam removal tools cutting processing time by 60-70% compared to manual methods.
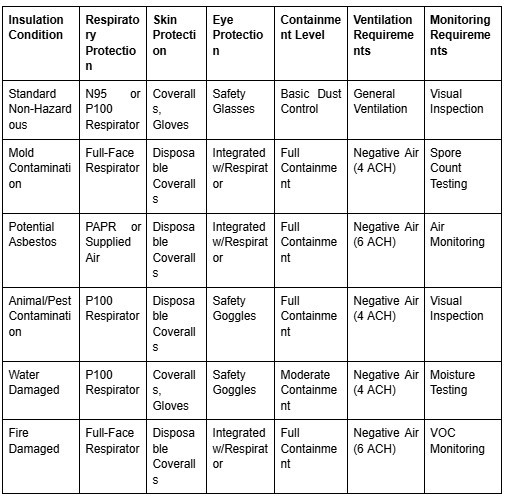
The removal process requires proper safety protocols, including respiratory protection (minimum P100 respirators for all materials, full-face respirators or PAPRs for contaminated situations), complete skin coverage, controlled negative pressure environments, and proper disposal procedures. These measures prevent exposure to harmful substances frequently found in older insulation, including asbestos (pre-1990 vermiculite), formaldehyde (pre-2000 materials), rodent/pest contamination, and accumulated dust/allergens.
Insulation Removal Methods by Material Type
Different insulation materials require specific removal approaches to maximize efficiency and safety:
Bonus Tip: For partially damaged insulation, targeted spot removal often proves more cost-effective than whole-area removal. Isolate and remove only the affected sections, then match new insulation to the existing material for seamless integration.
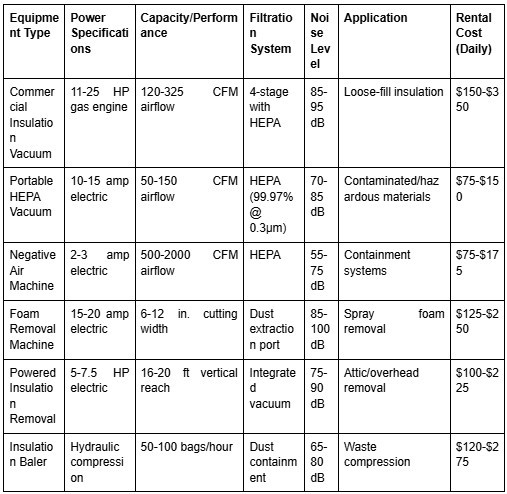
Professional Removal Equipment Specifications
Specialized equipment significantly improves the safety and efficiency of insulation removal:
Step-by-Step Removal Process
The insulation removal process follows a systematic approach for maximum safety and efficiency:
Preparation and Containment
Create an effective work zone that prevents cross-contamination between the removal area and the rest of the building. Establish containment barriers using 6-mil polyethylene sheeting. Create a negative pressure environment using HEPA-filtered air machines (minimum 4 air changes per hour). Set up a two-chamber decontamination area between the work zone and clean areas. Protect adjacent surfaces and HVAC systems with sealed coverings. Pre-vacuum the access route to minimize tracking contaminants.
Material Identification and Testing
Identify the insulation type to determine appropriate removal techniques. Conduct testing for hazardous materials in insulation manufactured before 1990. Sample suspect materials using EPA-approved methods. Test for asbestos in vermiculite insulation (found in approximately 70% of pre-1990 installations). Check for elevated formaldehyde levels in older fiberglass products. Inspect for signs of rodent infestation, mold growth, or water damage.
Equipment Setup and Operation
Position removal equipment for optimal workflow efficiency. Set up vacuum systems with the shortest possible hose runs to maintain suction power. Ensure proper grounding of all electrical equipment. Verify all equipment filters are properly installed and sealed. Establish a waste collection point with appropriate containment. Maintain continuous negative pressure throughout the process.
Bonus Tip: When removing attic insulation, start at the point furthest from the access and work toward the exit. This prevents workers from tracking through areas already cleaned and maintains a cleaner work environment throughout the project.
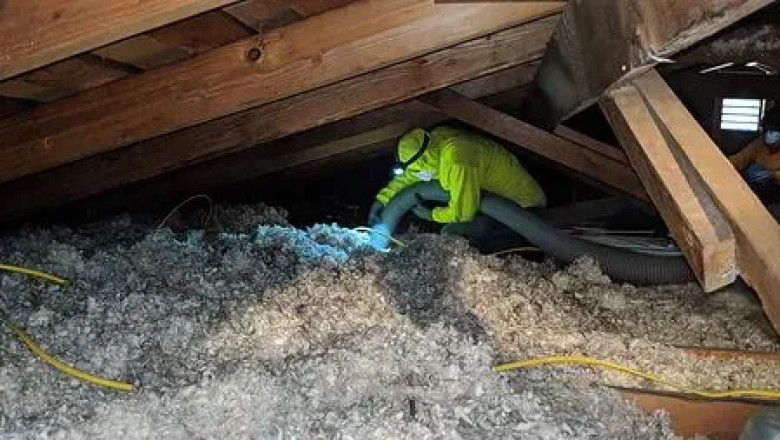
Material Collection and Disposal
Follow proper protocols for insulation waste handling and disposal. Double-bag all removed insulation in 6-mil contractor bags. Use insulation balers to compress material and reduce disposal volume by 60-70%. Label all waste according to local regulations, especially for hazardous materials. Transport waste in covered vehicles to prevent airborne release. Dispose of materials at facilities authorized to accept insulation waste. Obtain disposal documentation for project records.
Post-Removal Cleaning and Verification
Perform thorough cleanup to ensure all insulation particles are removed. HEPA vacuum all surfaces within the work area. Conduct a visual inspection using high-intensity lighting. Perform clearance testing for projects involving hazardous materials. Remove containment systems carefully to prevent releasing captured dust. Verify air quality meets acceptable standards before reoccupying.
Insulation Removal Safety Requirements
Safety equipment requirements vary based on the insulation type and condition:
Market Trends in Insulation Removal
The insulation removal industry has evolved significantly in recent years:
According to the North American Insulation Contractors Association, insulation removal services have grown by 27% since 2020, driven by increased awareness of indoor air quality and energy efficiency retrofits. The average cost of professional insulation removal ranges from $1.50 to $4.00 per square foot depending on material type, accessibility, and contamination level, with specialized situations involving hazardous materials commanding higher rates of $4.00-$7.00 per square foot.
The equipment rental market for insulation removal has expanded at 15% annually for the past three years, indicating a growing trend toward DIY removal for non-hazardous situations. Meanwhile, 85% of professional insulation contractors now offer removal services as part of comprehensive insulation replacement packages, up from 65% five years ago.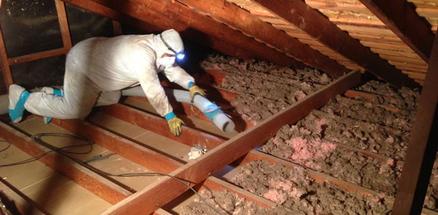 Things to Consider Before Making a Decision
Project Scope Assessment
Evaluate the full extent of insulation removal needs before beginning. Determine whether partial or complete removal is necessary. Consider the accessibility of the insulation location. Calculate the volume of material to be removed. Assess any structural obstacles that might complicate removal. Estimate project timeline based on material type and square footage.
Contamination Evaluation
Determine if the insulation contains or has been contaminated by hazardous materials. Conduct testing for asbestos if the building was constructed before 1990. Assess for significant mold growth that might require specialized remediation. Check for rodent or pest infestation. Evaluate water damage extent and source. Look for signs of fire damage that might have introduced toxins into the insulation.
Equipment and Resource Requirements
Determine what equipment will be needed based on insulation type and location. Calculate labor requirements based on square footage and complexity. Assess disposal facility options and requirements in your area. Identify specialized tools needed for particular insulation types. Consider rental vs. purchase costs for equipment. Evaluate personal protective equipment needs and availability.
Professional vs. DIY Considerations
Weigh the pros and cons of professional versus do-it-yourself removal. Consider safety risks associated with the specific insulation type. Evaluate your experience with similar projects. Calculate time savings of professional services versus cost. Assess your physical capabilities for handling the demands of insulation removal. Consider liability issues, especially for rental properties or multi-unit buildings.
Insulation Removal Made Easy FAQ
When is insulation removal necessary versus adding new insulation on top?
Insulation removal becomes necessary when the existing material is damaged by water, contaminated with mold or pests, compressed and ineffective, or contains hazardous materials like asbestos. Simply adding new insulation over damaged materials can trap moisture, harbor contaminants, and reduce overall system effectiveness. Complete removal is essential when existing insulation has lost more than 25% of its R-value through compression or damage, when moisture content exceeds 15%, or when pest infestation has created biohazard concerns.
What are the most common hazards encountered during insulation removal?
The most common hazards during insulation removal include respiratory irritants (fiberglass particles, cellulose dust), biological contaminants (mold, animal waste, pest residue), potential carcinogens (asbestos in vermiculite, formaldehyde in older materials), and physical hazards (unstable attic flooring, electrical wiring, sharp fasteners). Approximately 35% of insulation removal projects discover previously unknown hazards, with mold contamination being the most frequent (found in 22% of projects), followed by pest infestation (18%) and water damage (15%).
How can I determine if my insulation contains asbestos?
Identify potential asbestos-containing insulation by age (particularly vermiculite insulation installed before 1990), appearance (small, accordion-like pebbles with a grayish-brown or silvery-gold color for vermiculite), and location (commonly found in attics and walls of homes built before 1990). The only definitive method for asbestos identification is laboratory testing by an accredited facility. Collect a sample following EPA guidelines or hire a certified asbestos inspector. Never disturb suspected asbestos-containing materials during sampling or inspection.
What equipment is absolutely necessary for DIY insulation removal?
Essential equipment for DIY insulation removal includes respiratory protection (minimum P100 respirator), full-body coveralls with hood, gloves, eye protection, a commercial-grade insulation vacuum with HEPA filtration for loose-fill materials, heavy-duty contractor bags, sealing tape, utility knives for batts, and adequate lighting. For safe removal, you'll also need containment materials (6-mil plastic sheeting), a shop vacuum with HEPA filter for cleanup, and appropriate disposal containers. Projects over 100 square feet typically require a commercial insulation vacuum rather than a standard shop vacuum for effective material capture.
How long does professional insulation removal typically take?
Professional insulation removal timing varies by material type, space size, and accessibility. For a standard 1,500 square foot attic, loose-fill fiberglass removal typically takes 4-6 hours with a two-person crew using commercial equipment. The same space with spray foam insulation might require 8-12 hours. Factors that extend the timeline include limited access points, contamination requiring additional containment, structural obstacles like cross-bracing, and extremely thick insulation layers. Most residential projects are completed within one working day, while commercial projects may require multiple days based on square footage.
Make the Right Decision
Effective insulation removal requires matching the appropriate technique and equipment to the specific material type and condition. Prioritize safety through proper respiratory protection, containment, and hazard assessment, particularly for older insulation that may contain asbestos or other harmful substances. Evaluate the full scope of your project, considering contamination level, equipment requirements, and your personal capabilities before deciding between professional services and DIY approaches. For contaminated materials or situations requiring specialized equipment, professional removal typically provides the safest and most efficient solution, while simple bat removal in good condition may be appropriate for experienced DIYers with proper protection.Visit: Prestige Insulation Solutions LLC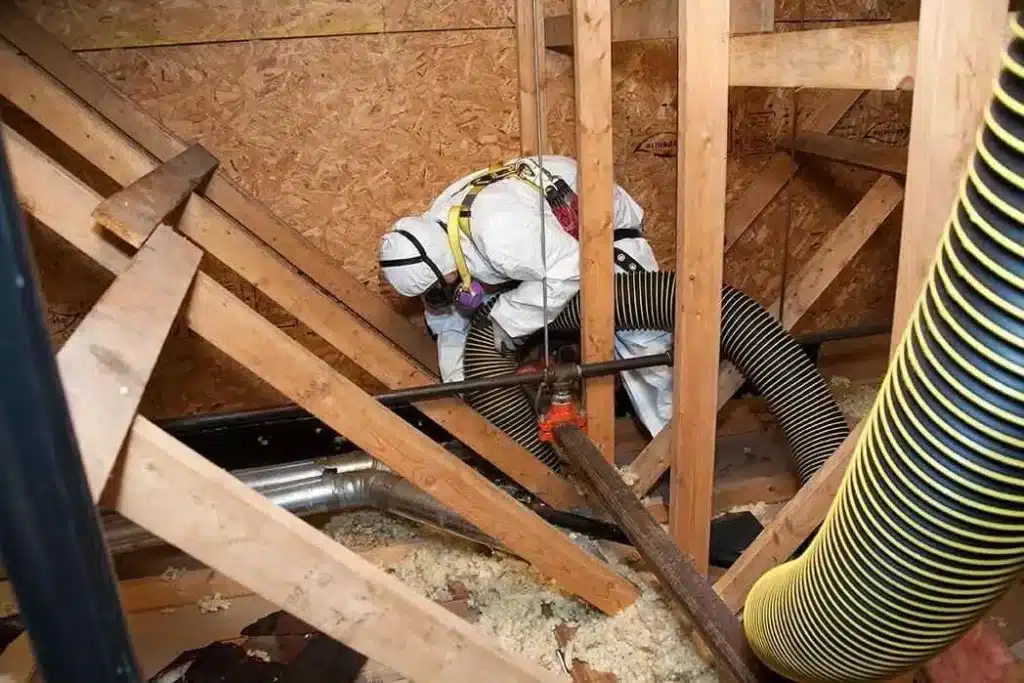 Reviewer
With over 13 years in spray foam insulation, Benjamin Lee reviewed this content and offered feedback aimed at helping growing businesses connect with local homeowners and commercial clients more effectively.


Comments
0 comment